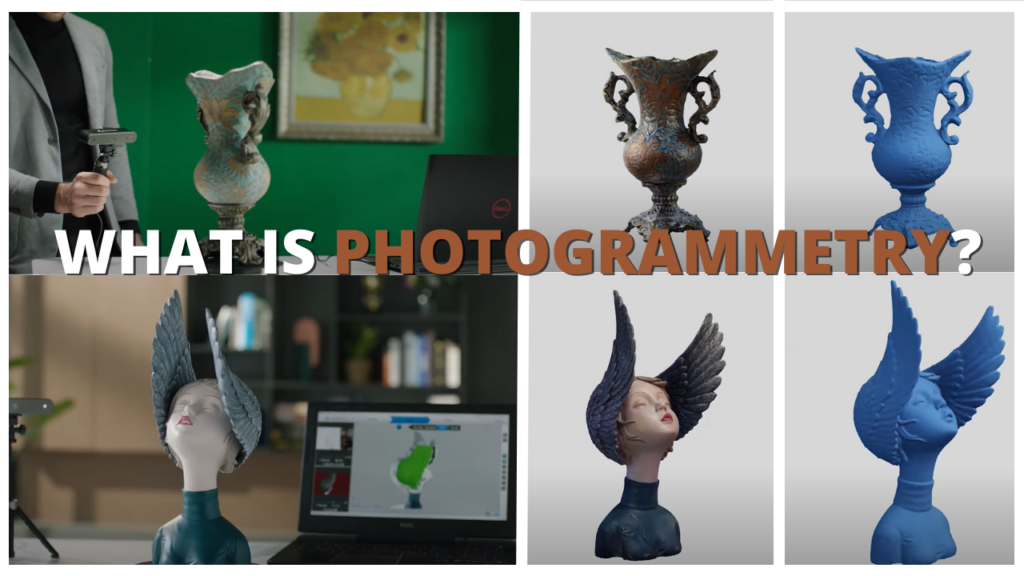
Photogrammetry, the art of creating 3D models from photographs, is no longer reserved for professional labs or studios. Today, thanks to advancements in technology and accessible software, it’s possible to do photogrammetry right from the comfort of your home. Whether you’re interested in 3D modeling for gaming, virtual reality, digital art, or just want to experiment with new technology, learning how to do photogrammetry at home opens up a world of creative possibilities.
Photogrammetry is a technique that allows you to create accurate, realistic 3D models of physical objects or scenes by using a series of overlapping photographs. Simply put, photogrammetry uses 2D images taken from multiple angles to reconstruct an object or space in a 3D format. This process is incredibly versatile and is used in industries like archaeology, architecture, gaming, digital preservation, and even film production.
A Brief History of Photogrammetry
Historically, photogrammetry was a technique reserved for surveying, mapping, and archaeological projects. Before digital cameras and sophisticated software, photogrammetry relied on specialized equipment and film photography. With the digital revolution, however, photogrammetry has become more accessible, and its applications have grown.
Today, photogrammetry isn’t limited to large projects or high-budget settings. With just a smartphone or a basic camera, anyone can explore at-home photogrammetry and create high-quality 3D models. As the technology improves, more people are discovering photogrammetry’s potential, leading to creative and practical applications in both professional and personal projects.
Why Do Photogrammetry at Home?
Photogrammetry at home offers a unique way to bring objects, spaces, and even memories into the digital world. Here are some popular applications for at-home photogrammetry:
- 3D Modeling for Games and VR: Photogrammetry allows for the creation of realistic assets for use in virtual environments.
- Art and Design Projects: Artists can use photogrammetry to capture objects, sculptures, or even textured surfaces, bringing physical artwork into the digital space.
- Digital Preservation: Capture and preserve precious family heirlooms or fragile items by creating a digital 3D model.
- Educational Projects: From science projects to historical recreations, photogrammetry is a great tool for students and educators alike.
Whether for professional purposes or just for fun, at-home photogrammetry can unlock a new level of creativity and skill-building.

How Photogrammetry Works: The Basics of the Process
To understand how to do photogrammetry at home, it helps to first grasp the core principles behind the process. At its most basic level, photogrammetry takes a series of 2D images and uses computer software to analyze, align, and reconstruct these images into a 3D model. This transformation relies on the way cameras capture light and perspective, and it requires specific techniques to ensure the final model is accurate and detailed.
The Principles of Photogrammetry
Photogrammetry relies on three main principles: multiple perspectives, alignment, and depth reconstruction. Here’s a breakdown:
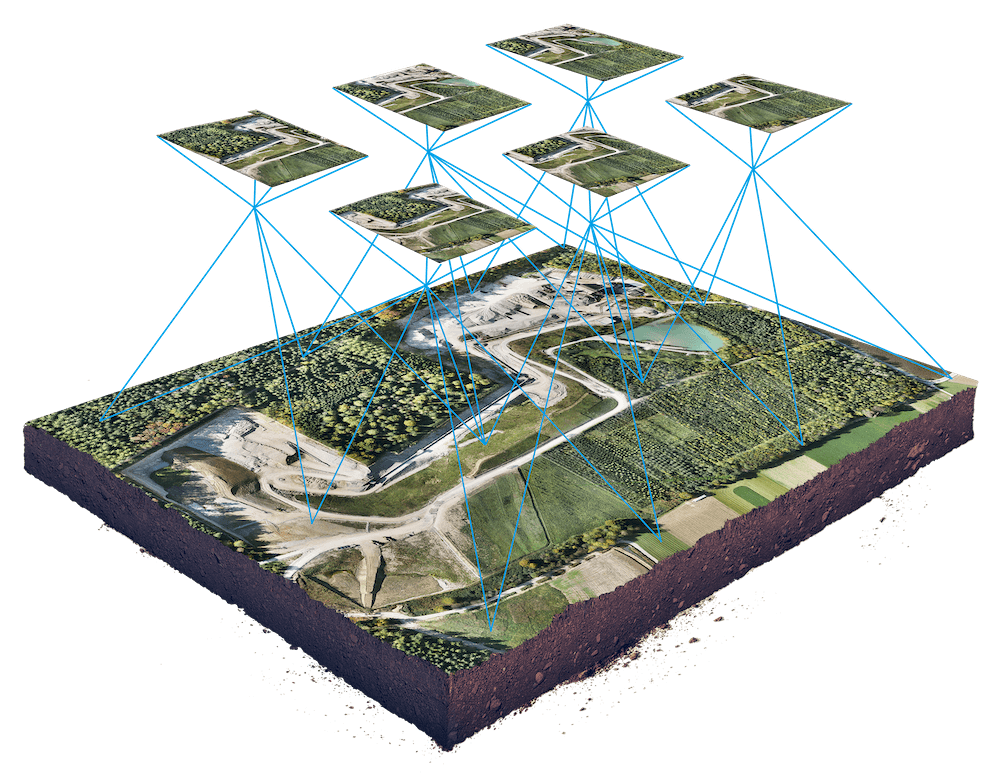
- Multiple Perspectives: To create a complete 3D model, you’ll need photos of the object from various angles. Think of it like a jigsaw puzzle where each photo is a piece that helps complete the whole. The more angles you capture, the more details the software can recognize and reconstruct.
- Alignment of Photos: Photogrammetry software uses sophisticated algorithms to align each photo with others in the sequence. This alignment process recognizes unique features in each image (like edges, textures, and corners) and matches them with features in other images. This step is crucial because misaligned photos lead to poor-quality models.
- Depth Reconstruction: Once the photos are aligned, the software calculates the distance between each point to build depth. This is where the 3D model takes shape. The program uses the depth information to create a “point cloud,” which is a set of data points in 3D space that represent the object’s surface.
How 2D Photos Become 3D Models
Imagine taking multiple photos of a vase from every angle, ensuring you capture its entire surface. When you upload these photos into a photogrammetry program, it begins by identifying common points between each image. These points are then used to generate a “point cloud,” essentially a framework that starts to define the shape of the vase. The point cloud acts like a skeleton of your model, giving the software a reference to create the object’s detailed surface.
Once the point cloud is built, the software fills in the details by creating a “mesh” over it, adding texture and color to make the model look realistic. At this point, the 3D model resembles the original object in both shape and texture, thanks to the software’s ability to recreate fine details and surface features.
Key Concepts in Photogrammetry
To get the best results with photogrammetry, it’s important to understand a few essential concepts:
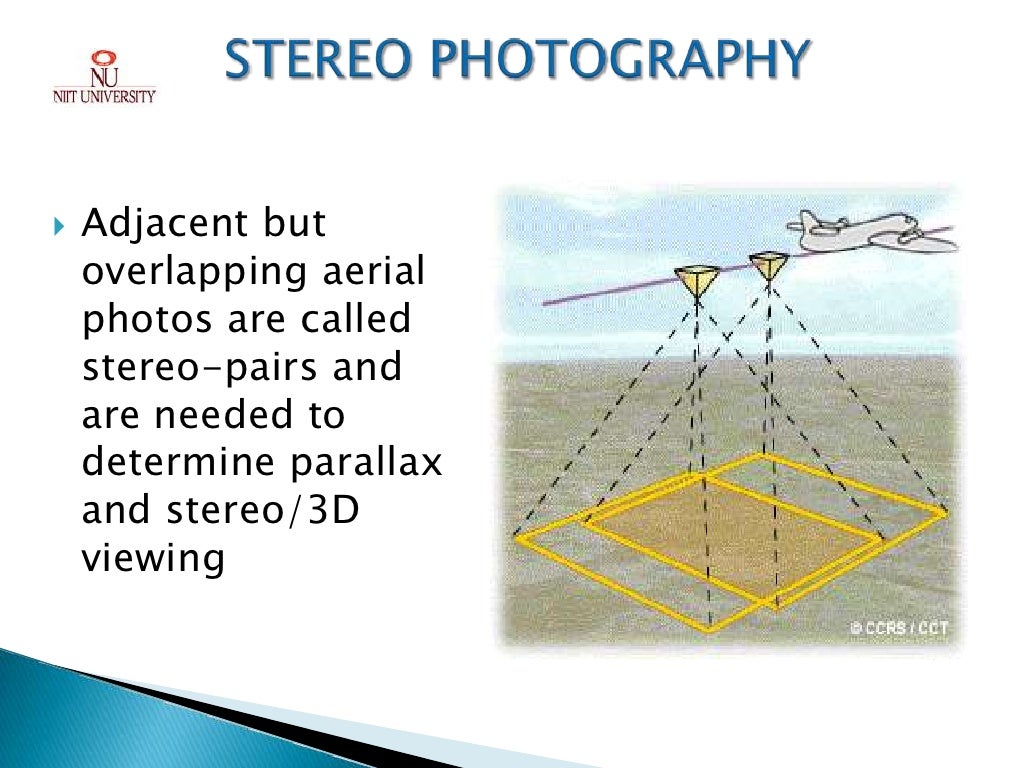
- Overlap and Coverage: Each photo should overlap with the adjacent photos by at least 60–80%. This overlap ensures that the software can align photos correctly and recognize features consistently.
- Lighting and Shadows: Uneven lighting or harsh shadows can create challenges in photogrammetry. Shadows can cause the software to misinterpret surfaces, while inconsistent lighting might affect texture quality. Ideally, use even lighting for best results.
- Image Resolution and Quantity: Higher-resolution photos capture finer details but can require more computing power. Similarly, more images lead to a more detailed model but will also demand more storage and processing capacity.
Photogrammetry is a technology where precision matters; each of these factors influences the quality of your 3D model. A well-prepared project with consistent lighting, good overlap, and sufficient image resolution will yield the most accurate and visually appealing results.

What You Need to Do Photogrammetry at Home
One of the most exciting aspects of photogrammetry today is that it doesn’t require specialized, high-end equipment. With a few essential tools, most of which you might already have at home, you can start creating impressive 3D models. Here’s a breakdown of the equipment, software, and setup you’ll need to get started with at-home photogrammetry.
Camera Equipment: Choosing the Right Camera
When it comes to photogrammetry, camera quality does matter, but you don’t need a top-of-the-line DSLR to get good results. Here are some options to consider:
- Smartphone Cameras: Today’s smartphones often come with high-resolution cameras that are surprisingly effective for photogrammetry. The key advantage here is convenience—almost everyone has a smartphone, and they’re easy to use. Just make sure your phone camera has at least 12MP resolution for clear details.
- DSLR and Mirrorless Cameras: If you want to achieve the best results, a DSLR or mirrorless camera is an excellent choice. These cameras allow for full control over settings like ISO, shutter speed, and aperture, which can improve photo quality and consistency.
- Tips for Capturing Better Photos:
- Use a tripod to keep shots steady.
- Adjust ISO settings to reduce grainy textures in low-light conditions.
- Keep the aperture around f/8 for sharp, evenly lit photos.
Ultimately, the camera choice comes down to what’s available to you. While a higher-end camera might yield slightly better results, a smartphone camera is a great place to start for beginners and will work for most photogrammetry projects.
Software for Photogrammetry at Home
Photogrammetry relies on software to process the images and turn them into a 3D model. There are several options available, each with its own set of features, learning curves, and price points. Here’s a look at some of the best software choices for at-home photogrammetry:
- Agisoft Metashape: One of the most popular photogrammetry tools, Metashape offers robust features for both beginners and advanced users. It’s a paid software with powerful tools for high-quality 3D modeling.
- RealityCapture: Known for its speed and high accuracy, RealityCapture is a strong contender in photogrammetry software. It’s particularly well-suited for users with powerful computers, as it can process images quickly and create detailed models.
- Meshroom: An open-source, free option, Meshroom is great for beginners who want to explore photogrammetry without investing in paid software. It’s relatively user-friendly and offers enough features for high-quality results, although it may take longer to process than paid options.
| Software | Cost | Best For | Features |
|---|---|---|---|
| Agisoft Metashape | Paid | Professional & Home | Advanced processing, user-friendly interface |
| RealityCapture | Paid | Advanced users | Fast processing, high accuracy |
| Meshroom | Free | Beginners | Open-source, great for learning |
Choosing software comes down to your goals, budget, and computer capabilities. If you’re just starting out and testing photogrammetry as a hobby, Meshroom or a trial version of paid software might be all you need.
Computer Requirements: Powering Your Photogrammetry Projects
Photogrammetry processing is computationally intensive, as it involves aligning, processing, and rendering high-resolution images into a detailed 3D model. Here’s what to keep in mind for your computer setup:
- Minimum Specs:
- Processor: Multi-core processor, preferably Intel i5 or higher.
- RAM: 8GB minimum; 16GB or more recommended for better performance.
- GPU: Dedicated graphics card (NVIDIA or AMD) with at least 4GB VRAM.
- Storage: SSD is preferable, as it speeds up data transfer when dealing with large files.
- Optimizing for Photogrammetry:
- Close other applications while processing models to free up memory.
- Use a cooling pad or external fan, as long photogrammetry sessions can generate heat.
- Consider upgrading your RAM or GPU if you plan to work on complex projects.
While a high-end computer isn’t strictly necessary to start with smaller projects, complex models with hundreds of photos will require more processing power. Even so, many beginner models are manageable on mid-range computers.
Setting Up Your Workspace for Photogrammetry
Preparing the right environment is a key step in creating accurate and high-quality models. A good workspace can help you control lighting, reduce shadows, and maintain consistency across your photos. Here’s how to set up a photogrammetry-friendly workspace:
- Lighting Setup:
- Natural light is ideal when possible. A cloudy day offers soft, even lighting, which is perfect for photogrammetry.
- For indoor setups, use consistent artificial lighting (like soft LED lights) on both sides of your subject to eliminate shadows.
- DIY Lightboxes:
- If you’re photographing smaller objects, a DIY lightbox can help you control the lighting environment. This can be made with a cardboard box, white paper, and LED lights, creating a balanced lighting setup for capturing detail.
- Background and Surface:
- Use a neutral, non-reflective background to avoid unnecessary reflections or colors that could interfere with the photogrammetry process.
- A solid surface or turntable is ideal, allowing you to rotate the object while keeping it in the same spot.
With the right equipment, software, and workspace, you’re now ready to start capturing images for your photogrammetry project. Taking the time to prepare properly can make a significant difference in the final model’s quality and accuracy.
![drone photogrammetry an indepth guide [new for 2024] drone photogrammetry an indepth guide [new for 2024]](https://149355317.v2.pressablecdn.com/wp-content/uploads/2023/09/drone-photogrammetry-guide.png)
Preparing for Your First Photogrammetry Project
Now that you have the essential tools and setup, it’s time to start preparing for your first at-home photogrammetry project. This preparation phase is crucial for capturing high-quality photos that will make the modeling process smooth and successful.
Choosing Your Object or Scene
Choosing the right object to capture is one of the most important steps in photogrammetry. Some objects are inherently easier to model than others due to their texture, shape, and surface details. Here are some tips for selecting an ideal object:
- Start with Small to Medium-Sized Objects: For beginners, smaller objects like sculptures, plants, or everyday items (e.g., mugs, vases) are easier to capture. Medium-sized objects are also manageable as they don’t require an excessive number of photos.
- Avoid Reflective or Transparent Surfaces: Reflective and transparent objects, like glass or shiny metals, are challenging because the software has difficulty interpreting these surfaces. If you need to capture a reflective object, consider applying a temporary matte coating (such as a fine layer of spray powder) to reduce reflections.
- Look for Texture and Details: Objects with complex textures and surface details work well in photogrammetry. Textures like wood, fabric, or stone provide unique reference points that help the software align photos more accurately.
- Example Choices: Start with textured items like rocks, plants, pottery, or fabric-covered objects. These provide clear details and are generally easier for the software to process.
Setting Up Your Workspace
A well-prepared workspace will make a significant difference in the quality of your photogrammetry results. Consistent lighting, controlled shadows, and a stable environment all contribute to more accurate 3D models.
- Lighting Tips: Photogrammetry requires even, consistent lighting. Natural light on a cloudy day is ideal, as it minimizes shadows and provides a neutral light source. If you’re working indoors, use two to three soft LED lights positioned around your object to ensure even coverage.
- Using a Turntable: If you’re working with smaller objects, a turntable can help you capture multiple angles without moving the camera. By rotating the object rather than changing the camera’s position, you can keep your shots aligned and make the process smoother. Simply rotate the turntable slightly between each shot for comprehensive coverage.
- Background Considerations: Choose a neutral, non-reflective background. A plain white or gray backdrop works best, as it won’t distract or interfere with the software’s analysis. If you’re photographing a small object, a DIY lightbox can help control the lighting and provide a clean background.
Planning Your Shots
When it comes to photogrammetry, the quality and quantity of your photos are essential for building a high-resolution 3D model. The general rule of thumb is that more photos with good overlap lead to better results. Here’s how to plan your shots effectively:
- Capture All Angles: Plan to capture at least a 360-degree view of the object, taking photos from various heights (low, medium, high) to cover the entire surface. For smaller objects, this might mean taking around 40–80 photos, while larger objects could require over 100.
- Ensure 60–80% Overlap: Each photo should overlap with the adjacent ones by at least 60–80%. This overlap helps the software align and merge the images accurately. Without enough overlap, you might end up with “holes” or missing parts in your 3D model.
- Experiment with Different Distances: Begin by taking wider shots to establish a rough outline, then take closer shots to capture finer details. Experimenting with different distances can add more depth and clarity to the final model.
- Avoid Blurry Photos: Use a steady hand or a tripod to keep each shot sharp. Blurry images can cause alignment errors in the software, which may lead to inaccurate models. Check each photo for sharpness before moving to the next angle.
Sample Shot Plan for Beginners
Here’s a simple guide for capturing a small object (e.g., a plant or vase):
| Shot Angle | Distance | Number of Photos | Overlap |
|---|---|---|---|
| Top View | Close | 10–15 | 70% |
| Side View (360°) | Mid-range | 20–30 | 80% |
| Low Angles (360°) | Close | 10–20 | 70% |
| Detail Shots | Very Close | 10 | 60% |
This plan will give you comprehensive coverage of the object while ensuring that the software has enough reference points for alignment.
Taking the time to carefully plan your shots and set up your workspace will greatly improve your chances of creating a high-quality 3D model. Photogrammetry requires precision and patience, but with these steps, you’ll be well on your way to a successful project.